
Meet
![]() In order to use virtual meetings, you must have at minimum, a Microphone and Speakers in order to be able to speak and hear the others in the meeting.
In order to use virtual meetings, you must have at minimum, a Microphone and Speakers in order to be able to speak and hear the others in the meeting.
If you want to use Video, you must have a Webcam or Camera of some sort to transmit video.
Once you completed the settings
Click the Meet button on the menu on the left.
The first time you do this you will be able to select which speakers you want to use and which camera you want to use. Once you have selected these, you may be prompted by your web browser to allow the speaker and camera to be used. Select Allow.
NOTE: If you wish to use the App on a Smart Phone or Tablet, you must go to the App Store for your phone and download the 3CX Web Conferencing App.
Once you have everything configured, you will see your camera Image on your screen.
You are now ready to start your conference.
There are a number of ways to do this, but this is the quickest and simplest way and gives you the most flexibility.
![]()
On the right-hand side of the screen, you will see the menu shown above.
The third Icon from the right shows a torso with a plus sign. Click this to add participants to the meeting.
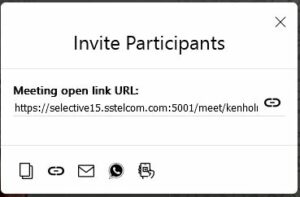
You will see the link for the meeting under “Meeting Open Link URL
Click the oval button on the right of the link. This will copy the link to the clipboard.
Open Notepad, or whatever you choose, and save this link. This will always be your link for inviting participants to your meetings.
You can send the link using whatever Calendar program you are using to schedule a meeting, or you can send it in an Email, Text Message, Messenger, WhatsApp or however you please. Once a participant has your link and you hold regular ad-hoc meetings, they can use the link to join a meeting at any time. Don’t forget, if you use Text, WhatsApp or Messenger and they want to open the link on their Smart Phone, they must have the 3CX Conferencing App Installed
Meeting Menu
![]()
Starting on the left and going right.
- The 3CX Icon collapses the menu to the right of the screen. If the menu is already collapsed, clicking the 3CX Icon will expand the menu.
- The Camera Icon will turn the video on or off if you have a camera.
- The Microphone Icon will mute or unmute the microphone.
- The Sharing Icon allows sharing.

- The next Icon, a box with an up arrow is the Share Menu.
- The First Icon allows you to share a Chalk Board or a Document you can write and draw on.
- The Icon with the Notepad allows you to Share PDF.
- The Icon with the screen allows you to share your screen. If you select this, it will open a drop-down list of open documents on your Desktop so that you can share the document you want and nothing else.
- The icon with the video camera allows you to share you camera. If you have more than one camera, you can select the camera you want to share. This allows you to use a camera to show members a closeup of whatever you want to show.
- The Icon with the white square an arrow allows you to share YouTube videos. You will be given the opportunity to insert thye YouTube link you want to share.
- The numbered notepad icon allows you to start a new poll.
- The Chat icon opens a chat window at bottom right.
- The Palm Icon raises your hand to indicate you wish to speak.
- The Group of torsos icon shows a list of participants
- The Round Button allows you to record the meeting.
- The Gear Wheel icon opens the setting window to allow you to change your camera or microphone and fine tune other settings. Bear in mind that Video consumes a lot of bandwidth. If you do not have a lot of bandwidth for your connection, do not select high video qualities that consume a lot of bandwidth.
- The Red Handset after the Gear Icon allows you to leave a meeting. If you are the host of the meeting, you have the option to Leave or End the Meeting.