
Bottom Menu.
![]()
Moving from left to right.
Teams: Clicking the Teams Icon allows you to see all of the members of your team.
If the member is marked with a Green square, they are available for calls. If the member is marked with a yellow square, they are busy talking to someone else.
Clicking the arrow to the right ofnthe member allows you to:
- Call their Extension.
- Leave a Voicemail.
- Intercom the extension.
- Conference them into a conference call.
- Initiate a Chat session
- Send them an email.
Address Book: Selecting the Address Book opens up your contact list. You can start typing a contact’s name, Double click it when you see it. This will open the contact and allow you to select which number to dial if they have multiple numbers.
History: History shows you a list of all incoming and outgoing calls. You may select any entry to re-dial it.
Voicemail: The envelope with the Handset and Envelope Icon allows you to see your voicemails. If your extension is set to send Voicemails by Email and the Delete them, this will always be empty s their will be no Voicemails to show.
Chat: Press the Chat Icon to see a list of all chats and initiate new chats. You can only Chat with members who have extensions on the system. If you select a contact from your Contact List that is not a member, you will be given the option to call them rather than Chat to the.
Video Conference: If you click the Icon with a group of people, you will immediately be transferred to the web client Meet option to set up a Video Conference. To see how to set up a Video Conference, see “Meet” under the Web Client menu.
Schedule a Conference: Clicking the group with the little clock allows you to schedule a conference for a future date.
You can select if this is an Audio Conference or a Video Conference.
You must select the calendar you are using and use your calendar to add participants and schedule a time and date.
The phone system will fill all the information the invited person needs to join the conference.
Switchboard: The Icon with the black rectangles open a Switchboard view of the phone system to give you a view of all user’s activity.
Settings: The Gear Wheels Icon opens the Settings Menu.
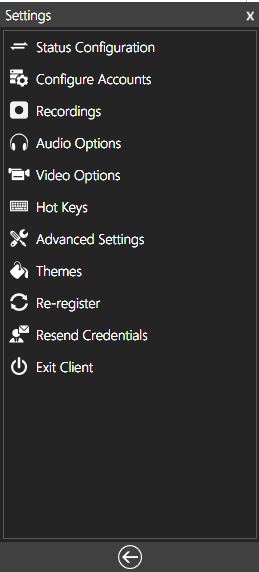
Status Configuration: Clicking status configurations opens your Status List. Clicking your Status List allows you to configure the routing for each Status. NOTE: You can configure the routing for External calls differently to internal calls. When you change your status from the top menu, calls will be routed they way you specify here.
Configure Accounts: You can have multiple accounts or extensions on the same PBX. This option will allow you to select the account you wish to use.
Recordings: If the system is set to record calls and your extension is set to enable you to see all incoming and outgoing calls to your extension, these recordings will be shown here.
Audio Options: Use this option to setup your speakers and microphones.
Video Options: Use this option to set up your cameras and web cams.
Hot Keys: You can set up keyboard shortcuts to provide quick access to tasks you use all the time. This is especially useful if you are only using a headset.
Advanced Settings: If you are using the switchboard you can use these settings to allow you to transfer calls by dragging and dropping them. There are also other settings to allow you to fine tune the App to fit your needs.
Themes: Allows you to select different themes for the App.
Re-Register: Re-registers your extension. Use this if you App is acting squirly.
Resend Credentials: Resend your Welcome Emails with all your information for using the phone system.
Exit Client: Shuts down the App.